Hominy: Unveiling the Age-Old Process of Transformation
Hominy vs. Grits: Understanding the Difference
Hominy and grits, while closely related, differ in both ingredients and texture. Hominy is made from whole corn kernels that undergo a process called nixtamalization, where they are treated with an alkaline solution—typically slaked lime—to remove the hull and germ, resulting in a chewy, hydrated ingredient. This traditional method is key to understanding how hominy is made.
Grits, on the other hand, are produced by coarsely grinding hominy, yielding a smooth, creamy texture that has become a beloved staple in Southern cuisine. If you're interested in learning how to make hominy, mastering this process is essential, as it forms the base for creating authentic hominy and grits at home. With just 6 steps, you can transform dried corn into a versatile and nutritious ingredient that serves as the foundation for countless comforting dishes.
Why Make Hominy and Grits at Home?
Making hominy and grits at home offers a wealth of benefits, from enhanced freshness and flavor to improved nutritional value. Learning how to make hominy using dried corn, slaked lime, and water to cover the kernels in a stainless steel pot gives you full control over the process and eliminates the need for preservatives commonly found in canned options. This traditional technique not only shows you how hominy is made through nixtamalization but also allows for creativity in texture and taste.
By grinding prepared hominy—especially when combining varieties like Harmony corn with hard wheat berries—you can create unique and flavorful grits. Homemade hominy and grits are not only more economical but also provide a protein-rich base for countless dishes, from corn tortillas to hearty cornbread.
What Are Hominy and Grits?
Hominy, a revered staple in various cuisines, undergoes a fascinating transformation through an ancient process known as nixtamalization. Derived predominantly from field corn, this technique of treating corn with an alkaline solution offers a multitude of culinary possibilities, from simple side dishes to intricate recipes like soups and stews. If you're wondering how to make hominy, the process begins by removing the hulls from the corn through nixtamalization, followed by a gentle simmer to bring out its unique flavor and texture.
Grits are a dish made from ground hominy, often served as a popular Southern food in the United States. When hominy is processed into a coarsely ground form, it creates hominy grits, which can be cooked to a creamy texture and enjoyed as a side dish or breakfast item.
Curious how is hominy made or how does hominy grow? Let’s delve into the intricate process of making hominy, a time-honored culinary tradition that removes the hulls and brings forth a versatile ingredient for diverse hominy recipes.
Understanding Field Corn's Role in Hominy Production
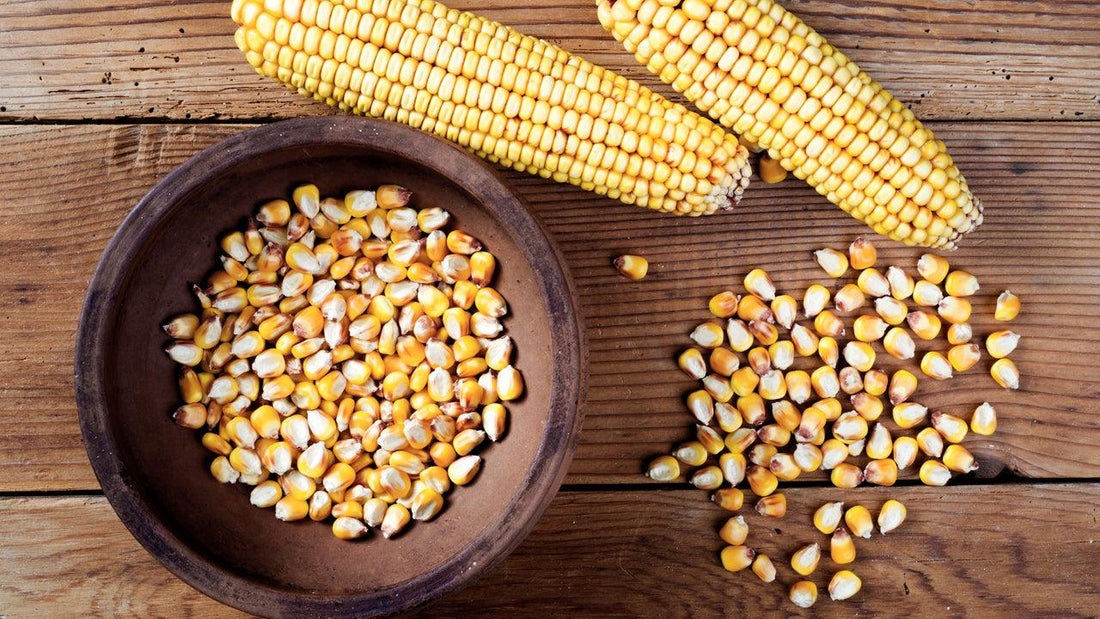
Field corn, distinct from sweet corn, serves as the primary ingredient for producing hominy. Unlike sweet corn, which is harvested when kernels are in their immature and sweet stage, field corn is left to dry on the cob until the kernels harden. Once the kernels are thoroughly dried, they are ready for the transformative journey into hominy.

Selecting the Right Ingredients
Choosing the Corn
Selecting the right corn is crucial for making delicious hominy and hominy grits. When you’re deciding how to make hominy, opt for dried corn varieties like dent corn or flint corn, as their texture and flavor are ideal for nixtamalization with slaked lime.
Whether you choose white corn or yellow, ensuring the corn kernels are whole and high-quality will enhance your results, allowing for better cooked hominy and coarsely ground hominy that elevates your dishes, from corn tortillas to cornbread.
Nixtamalization: The Alchemical Process Behind Hominy
Nixtamalization, an age-old technique practiced for over millennia, involves soaking dried white corn in an alkaline solution. Traditionally, wood ash or slaked lime derived from limestone facilitated this process. In modern times, food-grade lime or pickling lime, and even baking soda, have become go-to alternatives for creating the alkaline solution.
The process begins by preparing the alkaline solution, where the corn kernels are submerged. This alkaline bath triggers a reaction that effectively removes the hull and germ from the kernels gently. Beyond mere physical changes, this process enhances the nutritional value of the corn, making essential nutrients like niacin more accessible for human consumption, while producing big hominy with a superior texture.
Making Hominy: A Step-by-Step Guide
-
Corn Preparation: Start by selecting dried corn kernels, ensuring they are free of moisture. If using homegrown or bulk-purchased corn, ensure it's specifically field corn (Hopi Blue Dent or Glass Gem) suitable for nixtamalization. Remove any debris or broken kernels to ensure uniform soaking.
-
Alkaline Solution Preparation: Prepare the alkaline solution by dissolving food-grade lime or pickling lime in water. This solution should be ready before adding the dried corn.
-
Soaking Process: Immerse the dried corn kernels in the alkaline solution. Traditional methods involve allowing the corn to soak for an extended period, sometimes up to a day or more, until noticeable changes occur in the kernels.
-
Boiling or Simmering: To expedite the process, some opt for a brief boil or simmer after soaking. Add just enough liquid—typically about an inch of water above the corn—to cover the kernels and allow even softening. This step helps speed up the transformation, breaking down the tough hulls and allowing for easier removal.
-
Hulling and Rinsing: Once the soaking or boiling phase is complete, the corn is meticulously rinsed. This step involves washing away the softened hulls, revealing the transformed hominy kernels.
-
Storage or Utilization: The freshly made hominy can be used immediately in various recipes or stored for future culinary endeavors. Store it in airtight containers, refrigerate for short-term use, or freeze for prolonged preservation.

Turning Hominy into Grits
Grinding Methods for Grits
Turning hominy into grits involves grinding cooked hominy into a coarsely ground texture that’s perfect for various dishes. After you learn how to make hominy from dried corn using slaked lime, you can choose your grinding method—whether it’s a traditional stone mill or a modern food processor.
This step transforms your fresh hominy into hominy grits, ready to be cooked into a creamy side dish that enhances everything from corn bread to corn chips, showcasing the rich flavors of your homemade creation.
Traditional vs. Quick Cooking Grits
When it comes to grits, the choice between traditional and quick cooking varieties can significantly impact your meal. Traditional grits are made from whole kernels of dried hominy, requiring a longer cooking time where you might simmer them in a pot, stirring occasionally with a wooden spoon until creamy.
In contrast, quick cooking grits offer convenience, allowing you to enjoy this popular food in a fraction of the time, though they may sacrifice some of the depth of flavor that comes from the slow cooking process of homemade hominy.

Cooking Grits to Perfection
Basic Grits Recipe
Making creamy, lump-free grits is simple with just a few essential ingredients: water, salt, and grits. Start by bringing fresh water to a boil in a pot, then gradually add the grits while stirring with a wooden spoon to prevent lumps.
Once the mixture is combined, reduce the heat and simmer, stirring occasionally until the grits are tender and creamy—typically about 20 to 30 minutes for traditional grits. For an extra touch, you can incorporate a pinch of baking soda to enhance the flavor, making this popular food a delightful addition to any meal!
Enhancing Flavor: Cheese, Cream, and Herbs
Incorporating flavor-enhancing ingredients like cheese, cream, and herbs into your grits can transform them into a gourmet dish. After you cook your homemade hominy, simply stir in ingredients such as sharp cheddar or heavy cream while simmering, ensuring a smooth and rich texture.
For delicious variations, consider combinations like smoked gouda with fresh thyme or creamy Parmesan with a hint of garlic—each bringing a unique twist to this popular food and elevating your grits to new heights!
The Versatility of Hominy in Culinary Creations
Hominy's transformative journey unlocks a world of culinary possibilities. Once transformed, it can be finely ground to create masa for tortillas or used in recipes like pozole, a traditional Mexican soup/stew featuring hominy as a primary ingredient. Additionally, it can be incorporated into side dishes, adding texture and flavor to various meals. Its adaptability extends to being a key ingredient in crafting crispy and delectable tortilla chips.

Hominy's Culinary Legacy
Hominy, born from the ancient practice of nixtamalization, stands as a testament to culinary evolution. Its preparation involves an intricate process that not only removes the hulls but also enhances nutritional value. From its role as a versatile ingredient in soups and stews to its presence in snack foods like tortilla chips, hominy continues to showcase its relevance and time-honored legacy in diverse cuisines worldwide.
Making Grits, Masa, Corn Nuts, and More!
To make hominy grits, run your dehydrated kernels through a food processor until they are coarsely ground. To make masa, or corn meal, you can grind the hominy freshly cooked if you will be using it right away for tamales or tortillas, or you can grind the hominy once you've dehydrated it for long-term storage. To make corn nuts, fry the freshly cooked hominy until they're golden and crunchy. There are many other wonderful ways to eat your hominy or masa as well, such as tamales, tortillas, atole (and atole de chocolate), champurrado, pozole stew, hominy bread, mote, Jamaican polenta, rockihominy, and tlacoyos.
Additional Uses: Incorporating Dried Beans and Lye or Lime
Hominy's versatility is further highlighted by its compatibility with other staple ingredients like dried beans. Combining hominy with dried beans in soups and stews creates hearty and nutritious meals. Additionally, understanding the role of lye or lime in the nixtamalization process provides a deeper appreciation for the alchemical transformation of corn into hominy. Whether you choose traditional wood ash, slaked lime, or modern pickling lime, the key is in the careful preparation and soaking of the dried corn kernels.
Hominy, with its rich history and culinary potential, continues to be a beloved ingredient in kitchens around the world. From its ancient origins to its modern applications, the journey of hominy reflects a timeless tradition of transformation and nourishment.

Storing and Reheating Tips
How to Store Leftover Hominy and Grits
To store leftover hominy and grits, ensure they are completely cooled before placing them in an airtight container. This will help preserve their flavor and texture for future meals.
When you're ready to enjoy them again, simply reheat in a pot with a splash of fresh water or cooking liquid, stirring occasionally with a wooden spoon to achieve that creamy consistency, making sure to prevent any sticking or clumping as you warm up this popular food.
Best Practices for Reheating
When reheating leftover hominy and grits, it's best to use a pot over low to medium heat to gradually warm them up. Start by adding a splash of fresh water or your preferred cooking liquid to prevent them from drying out, then stir gently with a wooden spoon, ensuring even heat distribution.
For best results, continue stirring occasionally until the mixture is hot and creamy, allowing you to enjoy this popular food just as deliciously as when it was freshly made.

Benefits of Hominy and Grits
Nutritional Value of Corn-Based Foods
Hominy and grits offer impressive nutritional benefits, primarily due to their corn-based origins. Rich in carbohydrates, they provide a hearty source of energy while also being low in fat.
When made from dried hominy, these foods undergo nixtamalization—using alkaline solutions like calcium hydroxide—which enhances their digestibility and boosts their nutrient content, making them a valuable addition to a balanced diet. Plus, with the option to incorporate various flavors and ingredients, they can be both nutritious and delicious!
Grits and Gluten-Free Diets
Hominy and grits are excellent options for those following gluten-free diets, as they are naturally derived from corn and contain no wheat or gluten-containing ingredients. Made from dried hominy that undergoes nixtamalization with an alkalizing agent like calcium hydroxide, they maintain a unique texture and flavor while being safe for gluten-sensitive individuals.
Whether enjoyed as creamy grits or in their whole kernel form, these versatile dishes can be easily incorporated into a variety of recipes, making them a delicious and nutritious choice for everyone.
Conclusion
In conclusion, the journey from dried corn to hominy and grits reflects not only ancient culinary traditions but also the continued appeal of these versatile, nourishing foods. Learning how to make hominy offers the opportunity to engage with time-honored techniques like nixtamalization, where dried corn is treated with an alkaline solution to create the uniquely chewy, nutrient-rich kernels known as hominy. This process, fundamental to understanding how hominy is made, can be enhanced with methods such as adding baking soda to gently soften the kernels for easier processing.
By preparing hominy and grits at home, especially by grinding hominy or combining Harmony corn with hard wheat berries, you gain control over flavor, texture, and quality. Whether enjoyed as creamy grits, incorporated into a variety of savory recipes, or stored for future use, these traditional corn-based foods continue to offer delicious, wholesome options rooted in centuries of culinary heritage. If you're interested in starting your own journey, check out the corn seeds for sale at Grow Organic.
FAQs about How to Make Hominy and Grits: Discover How Hominy Is Made from Start to Finish
-
What is dried hominy, and how is it different from regular corn?
-
Dried hominy is field corn that has undergone nixtamalization, a process where kernels are treated with an alkaline solution, often using calcium hydroxide or food-grade lye. This process enhances flavor, texture, and nutritional value, making it different from regular corn.
-
-
How do I prepare the alkaline solution for making hominy?
-
To prepare the alkaline solution, dissolve calcium hydroxide or food-grade lye in hot water, creating a lye water mixture. This solution is essential for soaking the whole kernels, enabling the nixtamalization process.
-
-
How long should I soak the corn kernels?
-
Soak the dried field corn in the lye water for several hours or overnight. This allows the kernels to absorb the alkaline solution and swell, which is key for removing the hulls later.
-
-
What should I do after soaking the corn?
-
After soaking, drain hominy and rinse the kernels thoroughly under cold water to remove any remaining lye or alkaline solution. This ensures the kernels are safe to eat and ready for cooking.
-
-
Can I use hardwood ashes instead of calcium hydroxide?
-
Yes, hardwood ashes can also serve as an alkalizing agent in the nixtamalization process. However, using food-grade lye or calcium hydroxide provides more consistent results in texture and flavor.
-
-
How do I turn hominy into grits?
-
Once you’ve made hominy, simply grind the cooked kernels using a food processor or a traditional stone mill until they reach a coarsely ground texture. This process transforms your hominy into delicious grits, ready for cooking.
-
-
How should I store leftover hominy and grits?
-
Store leftover hominy and grits in an airtight container in the refrigerator for up to a week. You can also freeze them for longer storage, ensuring you can enjoy them later.
-
-
Can I add flavors to my grits?
-
Absolutely! Enhance your grits by stirring in ingredients like cheese, cream, or herbs while cooking. This allows for delicious variations that elevate your dish.
-


2 comments
Why did you cook the hominy 2 hrs after boil, simmer and soak. I’ve done a few batches without that step and wonder if I’m missing something. I’ve had decent grits but I’m looking to improve.
I put my freshly rinsed hominy in a dehydrator 12 plus hrs then is ready to grind. We have a flower mill called a Fidibus. It turns out grits as coarse or fine as you want. Check it out!
I bought the dried hominy in a bag at a Mexican market. I brought them to simmer in lye water for 30 minutes and let it soak overnight. I rinsed thoroughly and cooked in fresh water for two hours. I drained and am drying it so I can make grits by grinding it. I’d like any suggestions to make grits.