
Introduction to Drip Irrigation
Welcome to Part 1 of our five-part drip irrigation series, where we show you how to plan and assemble a complete faucet irrigation system. Whether you're using poly tubing, drip tape, emitterline, soaker hose, or micro sprinklers, every drip irrigation set up starts at the water source—your outdoor faucet.
- Time to Complete: 30–60 minutes
- Difficulty Level: Easy to moderate – beginner-friendly with basic tools
Watch Part 1: Set-Up at the Faucet or follow this step-by-step guide to learn how to connect a drip system to your faucet and build an efficient, customizable system for your garden.
Explore the full series:
- Part 2: Using Poly Tubing, Mini Sprinklers, Sprayers, and Emitters
- Part 3: Using Drip Tape in the Garden
- Part 4: Using Emitterline in the Garden
- Part 5: Using Soaker Hose in the Garden and Landscape

What Is a Drip Irrigation System?
A drip irrigation system delivers water directly to the root zone through drip irrigation system parts like emitters, tubing, filters, and pressure regulators. This reduces evaporation and runoff, conserves water, and promotes healthier plant growth in garden beds, raised beds, and landscapes.
By learning how to connect drip irrigation to a faucet, you ensure consistent, controlled watering. Many gardeners also choose to install a drip system with timer for hands-free irrigation.
Why Planning Is Important
Proper planning ensures your drip irrigation valve setup operates smoothly and delivers water effectively.
Benefits include:
- Preventing clogs and pressure issues (see common water pressure problems)
- Reducing water waste
- Maximizing plant health
- Ensuring compatibility of all drip irrigation system parts

Essential Drip Irrigation System Parts
Emitters
Emitters are key components that control the water output for each plant. Connect them to drip tubing or emitterline, and choose the appropriate flow rate for your plant needs. Learn more in Part 2 of our series.
Tubing & Connectors
Use ½" poly tubing to move water from the source to your garden. Customize the layout with elbows, tees, and starter fittings. Secure tubing with ground staples or mounting clips.
Filters & Pressure Regulators
Filters prevent clogging, especially important when using water from a well, pond, or ditch. Pair with a pressure regulator to maintain consistent flow. Learn how to adjust based on your system in this guide.

Types of Drip Irrigation Systems
- Surface Drip Irrigation: Emitters on the soil surface water plants directly with minimal waste.
- Subsurface Drip Irrigation: Emitters are buried under the soil, ideal for shrubs, trees, and drought-prone regions.
Learn more about system selection in our article, Take the Fear Out of Drip Irrigation, or explore the Resource Center for a complete drip irrigation parts diagram.
Planning Your Layout
- Time to Plan: ~15–30 minutes
- Tools Needed: Measuring tape, pen & paper
- Skill Level: Beginner
Before installation:
- Measure garden beds and distance from your water source.
- Sketch your garden layout with plant types.
- Decide if one water line can serve all zones, or if you need multiple zones.
- Choose your irrigation types: drip tape, emitterline, sprayers, or soaker hose.
See our Easy Drip Irrigation for Raised Beds guide for layout ideas.

How to Connect Drip Irrigation to a Faucet
Start your drip irrigation system at the water source—whether that’s a hose bib, outdoor faucet, or spigot near your garden. The following water hook-up parts form the essential foundation of any drip irrigation setup:
Faucet Assembly Steps:
-
Y-Connector or 4-Way Splitter
- Attach to your faucet so you can run your drip system while keeping other hoses connected for flexibility.
-
Vacuum Breaker
- This backflow preventer protects your water supply from contamination—especially important if using fertilizer injectors.
-
Flushable Y-Filter
- Filters out debris to prevent emitter clogs. An essential component for any system, especially if using well, pond, or ditch water.
-
Timer (Optional)
- Choose a mechanical or digital irrigation timer to automate your watering schedule and conserve water.
-
Fertilizer Injector (Optional)
- If included, install after the timer. It allows you to feed plants through the irrigation system.
-
Pressure Regulator
- Regulates water pressure to prevent damage to tubing and emitters. Use the appropriate PSI based on your system type (e.g., 10 PSI for drip tape).
Adding the Supply Line
With the faucet setup complete, it’s time to run your main line to the garden:
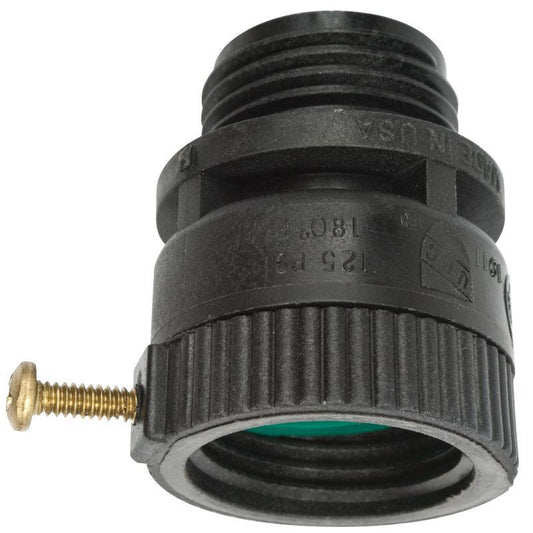
- Connect ½" poly tubing using a Power-Loc starter fitting (¾" female hose thread).
- Use Power-Loc elbows to go around corners or a Power-Loc tee to split lines where needed.
- Secure the tubing with ground staples or use mounting clips to fasten it to raised beds or wooden structures.
- This setup ensures a clean, secure, and expandable drip irrigation system—from the faucet to the garden edge. Next, you’ll be ready to install emitters, drip tape, or soaker hoses to deliver water directly to your plants’ root zones.

Conclusion
Setting up a drip irrigation system starts with a solid plan and the right parts. From faucet to tubing to emitters, each element must work together for maximum efficiency. With the help of a drip irrigation parts diagram and guides on maintenance, you'll create a reliable watering system that conserves water and grows healthy plants.
Explore more:
Ready to grow organic for life? Explore our full Resource Center for videos, diagrams, and how-to articles.
FAQs: Drip Irrigation – Planning and Set-Up at the Faucet
-
What is the best way to plan a drip irrigation system?
- Begin by measuring your garden beds and mapping out the layout, including where your water source is. Identify different plant zones, decide what type of drip components each area needs, and calculate how much tubing and how many emitters are required. Proper planning ensures efficiency and avoids overwatering or under-watering.
-
Can I connect a drip irrigation system directly to my faucet?
- Yes, most home gardeners start their system by connecting it to an outdoor faucet. You’ll need a backflow preventer, filter, pressure regulator, and appropriate connectors to transition from the faucet to your mainline tubing.
-
What components do I need to set up a drip irrigation system?
- Basic parts include a backflow preventer, filter, pressure regulator, tubing, emitters or drip tape, connectors, and optional items like timers and fertilizer injectors. Choosing the right combination depends on your garden’s layout and water needs.
-
Do I need a pressure regulator for my drip system?
- Yes, a pressure regulator is essential to prevent blowouts and ensure uniform water delivery. Drip systems typically require lower water pressure than standard household plumbing.
-
How do I choose between drip tape, emitterline, and soaker hose?
- Drip tape is ideal for row crops and annual vegetables. Emitterline is best for evenly spaced plants in beds or borders. Soaker hose is useful for dense plantings or landscapes where slow, deep watering is desired. Many systems combine multiple types based on the garden layout.
-
Should I install a timer with my drip irrigation system?
- Using a timer is highly recommended. It automates watering, reduces human error, and helps maintain a consistent schedule, especially during dry periods or when you’re away.
-
How long should I run my drip irrigation system?
- Run time depends on soil type, emitter flow rate, plant water needs, and weather. A typical schedule might be 30–60 minutes a few times per week, but it's best to test soil moisture and adjust accordingly.
-
How do I prevent my drip system from clogging?
- Use a filter to remove debris and flush the system regularly. Clean or replace emitters and inspect connections to keep everything functioning properly.
-
Can I use a garden hose as part of my drip irrigation setup?
- Yes, a garden hose can serve as the initial connection from your faucet to the start of your drip system. Just ensure proper fittings are used to transition from hose thread to tubing.
-
How do I troubleshoot uneven watering or dry spots?
- Check for clogs, pressure issues, or incorrect emitter placement. Uneven elevation, long tubing runs, or incompatible parts can also lead to inconsistent watering. Installing the correct pressure regulator and regularly inspecting your system can help resolve these issues.
4 comments
Lindsey, it would depend if you need all of your zones pressure reduced. I am not sure if your manifold has a minimum psi, that would also be a consideration. If you put it after the manifold, then each zone can be different giving you more flexibility in your irrigation system.
where would you place a pressure regulator (with filter) in your sequence of building a drip irrigation above ground with hose spigot. I am using with a controller with a 4 zone manifold.
Would each zone need a pressue regulator and filter or just one prior to entering the controller ?
Much Appreciated,
Lindsey
Hi there. I came across this series on drip irrigation (which is amazing by the way) and was very interested in seeing the diagrams that are mentioned in the video and linked in the blog for the first video. However, after clicking the link (https://www.groworganic.com/media/pdfs/irrigation-diagrams.pdf) I get an error that no file is available. Would it be possible to have this link fixed or email me the PDFs? Many thanks!
Thank you! I was having a hard time finding a step by step online for a beginning farmer. Very helpful. Do you recommend adding a PSI meter to the filter as well?